
To see if this custom-fit item will work for you please tell us what vehicle you'll use it with.
Features:
Specs:
 Alternate Instructions
California residents: click here
Videos are provided as a guide only. Refer to manufacturer installation instructions and specs for complete information.
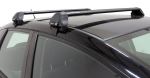
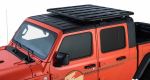
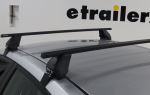
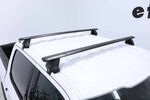
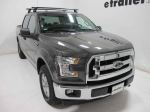
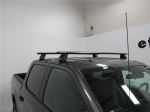
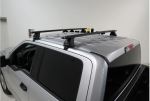
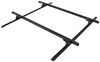
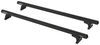
Hi, Matt of etrailer. Today we're gonna be talking about the Rhino-Rack Roof Rack with the HD bars on our 2020 Ford F-150. Now this will be a great option if you're looking for some really sturdy roof rack, so if you wanna take a closer look at it, we can talk about that now. It is important that you're getting the right one for you since you can get this in different kits. So just make sure you're putting your vehicle's information into our fit guide to make sure you're getting the right one for your vehicle. Now with these, any type of roof rack, they're gonna be great, especially if you're just trying to save space in your bed or on the back of your vehicle because F-150 is already a longer vehicle so if you're putting a trailer or a cargo carrier back there, it's just gonna be a little bit harder to get into those tight spots as opposed to just using your roof here.
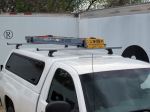
And your bed's not gonna be the best option for you if you have anything longer, like any type of skis or if you have any kayaks, this is gonna be the better option on your roof. So they're gonna be made up of three parts. The first one is gonna be the crossbar on the very top. Now this is gonna be a square type of bar and these are gonna be extra sturdy and we have this thick layer of rubber on the very top of it. So when you do have anything sitting on here, it's not gonna scratch anything up and it's gonna give it plain traction staying on there.
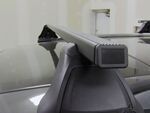
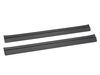
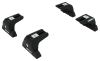
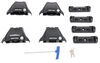
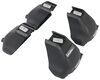
So it'll gonna give you a little bit more peace of mind if you have any accessories sitting here like a bike carrier or any type of roof box. Now when it comes to the part underneath it, we're gonna have our towers. So with these towers, we're gonna have a lock core on here. So yeah, it will give you more peace of mind. And underneath here we're gonna have the fit kit.
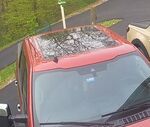
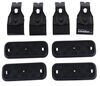
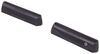
Now this fit kit's doing a really good job today. It's just gonna be comprised of a hook and a rubber pad underneath there. And that rubber pad, as you can see right here, we don't have any gaps. That's something I look for in a lot of roof racks because if we don't have any gaps, it's gonna reduce any wind noise up here and it's just gonna look nicer and gives me more peace of mind that's gonna do a good job at grabbing onto my roof. Get a couple measurements to see how it's sitting up here.
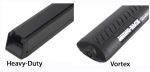
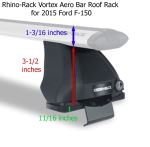
So the first one I'm gonna get is gonna be the overall height. So that's gonna add a little bit under five inches, which is kind of tall for a roof rack. What I'd recommend doing is taking the total height of your vehicle, grasp bars and anything sitting on top that so you know if you're gonna make it under a spot or not. Now another crossbar that I'd recommend with Rhino-Rack are gonna be those support bars. It's still gonna be something that's rugged and has a pretty good weight capacity, but they will sit a little bit more low profile to your vehicle. Now for the total distance underneath here, that's gonna be a little bit under three inches. So we're gonna be a little bit tight in that respect. If you have any type of clamps or a little bit more bulky, it might be kind of hard to reach 'them or if you have a sunroof on your vehicle, just be a little bit more mindful if that is expanding up so we don't make contact with anything. And for the overhang over here, we got a couple inches of spare. That's important to know if you have anything like skis 'cause you want to be able to reach that from point on the side of a vehicle. And as for how much they can handle, they're can handle quite a bit since they are the HD crossbars. But what's gonna be the most likely the limiting factor is gonna be your roof. So it's important just to check what your owner manual says about that and then go from the lowest rated component so you don't damage anything. So in my opinion, I think this is gonna be a solid choice for anyone who is looking for something that's just gonna give you more peace of mind, especially with those heavier items and they are gonna last quite a bit. So to begin the installation, what I like to do is just lay out all my stuff so I can take inventory. So we're gonna have the crossbar, we're gonna have the fit kit, both the hook and the pad, and we're gonna have the tower and the base that comes along with it. Now I do recommend having a tape measure in hand so you can make sure everything is even and make sure you have that tool that comes with your kit. I'll also grab some masking tape. Oh, we can talk a little bit more about this later on, but it helps, we just keep everything in the right spots. Now what we're gonna do from this point is just flip over this crossbar and you can take off these end caps. Now sometimes I find they're a little bit hard to actually remove. Sometimes they'll kind of fight you. So if it's really fighting you, what you can do instead is just make sure that this is plenty loose. We'll put it on in this orientation back in face this way, and we'll just slide that block into place. From there, I'll tighten this slightly. You're gonna have a bolt right here on there and that should turn that block underneath there some, I might even come back over here, push this thumb with my finger until it locks into place and we want it perpendicular with the crossbar, just like that. And we'll just tighten it down a little bit more, just enough to grab on there. I'm gonna adjust this and then if you have your instructions, you can naturally see where this sits exactly. So make sure you grab that, get the number from the distance from the back of that tower to the end of that crossbar. And once it's in the correct spot, you can attach it down the rest of the way and do that same process on the other side. And then if you haven't yet, you can put that foot pad on here. I took mine off real quick, but the way it goes on is you reference this arrow on here, reference your instruction to make sure it's pointing the right direction. My case, it's facing out, I'll just grab onto this metal bar. Then we'll grab our rubber foot pad here. Again, this is also gonna have a error on it, letting you know which direction it should be facing, either forward or behind you, and a number for what side it goes on, passenger or driver's side. Once we get this in the right orientation, then you'll just press it on to that footpad til it wraps around it completely. (tower clicks) And once that's on there, then you'll repeat that on the other side. And now we can put on our roof. So what I'll do typically is just kind of roughly place it there. It doesn't have to be perfect at this point. If you need, you can also grab a friend to help you out with this process. But before we get any measurements, I recommend having the front one on there at least two. And I can ask you talk about how we put these in the correct positions so you can actually mount this to your roof. When you reference your instructions, it's gonna give you an A and B measurement. Your A measurement is gonna be from this seam here where the doors meet to the edge of this pad of your crossbar. Once you get that to be the right measurement of what's in your instructions, then you can do that on the other side and mount it up here. And to get the B measurement, it's gonna be from the center of one crossbar to the center of the other one. Now I can actually show you how to mount it up there. So that process is really just when me making sure this is fit in there correctly. If you find that this isn't wide enough or it's too wide, we can always adjust this. The way you can tell if it's wide or not wide enough is if this is grabbing on to this corner on our roof right here, this gutter. If it is, we're good to go. And then I'll open up my door and remove this bolt here. When that bolt is fully removed, I'm gonna grab one of those clamps and we'll install it just by pushing it through that hole on the clamp itself and threading it back into this nut up here. I'll typically grab my other hand and help guide it through the backside. If you find it's kind of hard to grab it with your fingers, you can always grab that tool that comes with your kit, help guide it that way. Now, I wouldn't recommend tightening this all the way down. I'd recommend just having a little bit of resistance and then going to the other side so we have a good even fit on a roof. You just go back and forth until this is all the way tightened down then. And the way you're gonna be able to tell if this is tightened all the way is once you're turning this around, you find that this blue tab here straightens out like it is now, it's good to go. Then you'll just grab your end cap, put that into place, lock it up. And I like to give it a good shake test, make sure it's not gonna go anywhere. And if it feels pretty good, you can take it out for a ride. Now if you guys have any other questions, let us know here at etrailer. And again, I'm Matt, and thanks for watching.

I purchased Rhino rack. Very happy with price and quality
I purchased Rhino rack. Very happy with price and quality
Very good product. Excellent customer s ervice
Instructions were clear, measurements were accurate, and the assemblies are solid. All the posted photos showed exactly what to expect.
Great product, great price, great customer service.
Installation went well. Had one of the 4 locks that does not work.
So far so good! Quality seems great! Product is well priced! Fits well on my 2006 Acura TSX. The bends on the legs fit very well into the door jams.
Good quality, great instructions
Everything fit like a glove looks great and the instructions were easy to follow.
just had it put on today. Looks great. Going to get kayak tomorrow. Will know more when I see how it rides with kayak on it.
Arrived quickly and came with easy to read instructions. Only took me an hour to set it up, and it works great.
Great product. Didn't care for the look on a naked roof, but the service team is helping me with a speedy return. Thanks for the great service!
The Rhino rack I ordered is decent. However it arrived without all the pieces needed to assemble. I contacted etrailer and they wanted pics of the holes in the box ( which I understand they need to file a claim) Unfortunately I STILL haven’t received the required parts 2 weeks later and I’ve moved (why I needed the rack in the first place)
Item as described, Very helpful customer service. I highly recommend this company.
Worst instructions ever. Would not recomend.
Fast shipping and great product
perfect fit, fast shipping!

WORKED GREAT AND DIDN'T LEAVE ANY MARKS ON THE ROOF OF THE CAR
The keyhole is easy to put the security key into. Easy access to the screw to secure the clamps.
Very good product.excellent shipping.good price.
Great product! I didn't care for the look on a naked roof, but the team is helping me with a speedy return as we speak. Thanks for the great service!
Fast, efficient, great customer service and follow up.
Roof rack looks great. Easy to install.
Everything arrived very timely. Excellent craftsmanship and easy instructions. If I had known about this product sooner I would have bought the day I purchased my vehicle. Excellent service . Thanks


Do you have a question about this Roof Rack?
Info for this part was:
At etrailer we provide the best information available about the products we sell. We take the quality of our information seriously so that you can get the right part the first time. Let us know if anything is missing or if you have any questions.


Thank you! Your comment has been submitted successfully. You should be able to view your question/comment here within a few days.
Error submitting comment. Please try again momentarily.